티스토리 뷰
Docker-compose를 통한 Django + Nginx + Postgres 작업 [.dockerignore] [docker-compose 환경변수/env 파일 처리하기]
글을 쓰는 개발자 2021. 7. 21. 11:52
1. docker-compose.yml 파일
version: "3"

services:

  nginx:
    container_name: nginx
    build: ./nginx
    restart: always
    ports:
      - "7070:80"
    volumes:
      - ./backend/entry:/srv/code/entry
      - ./log:/var/log/nginx
    depends_on:
      - web


  db:
    image: postgres
    container_name: main.postgres
    restart: always
    environment:
      POSTGRES_DATABASE: "${DB_NAME}"
      POSTGRES_USER: "${DB_USER}"
      POSTGRES_PASSWORD: "${DB_PASSWORD}"
    ports:
        - "7000:5432"


  web:
    build: ./backend
    container_name: main.django
    command: uwsgi uwsgi.ini
    env_file:
      - ./backend/entry/.env
    volumes:
      - ./backend/entry:/srv/code/entry
      - ./log:/var/log
    depends_on:
      - db
    ports:
      - "8000:8000"
도커 컴포즈 되는 순서는 db -> web -> nginx 순서로 된다.
1-1. nginx
container-name: 컨테이너로 빌드되었을 때 컨테이너 이름을 말합니다.
build: 쉽게 이야기하면 dockerfile의 위치를 말합니다.
ports: 컨테이너의 TCP포트 80을 Docker 호스트의 포트 7070에 매핑( 쉽게 설명하자면 클라이언트가 7070포트를 통해 해당 컨테이너 80포트로 접속한다고 이해하시면 편합니다.)
volumes: data를 컨테이너가 아닌 host에 저장하는 위치를 선정하는 것인데 위에서는 로그파일을 볼륨으로 지정하였습니다.
depends_on: web이 먼저 빌드가 되고 nginx가 되는 순서로 설정하였습니다.
1-2. postgres
environments: postgres의 유저와 비밀번호 그리고 database를 세팅
1-3. web
env-file: web을 컨테이너화 할 때 필요한 환경변수를 파일로 세팅하는 방법이다. 필자의 경우에는 ".env"파일의 위치가 "./backend/entry/.env"에 있다.
volumes: <host에 배치할 위치> : <어떤 폴더 혹은 파일을 마운트할 경로(컨테이너 안에서)>
위에서 ports는 사실 필요없다.
1-4 . docker-compose 할 때 환경변수 파일 위치
같은 위치에 두면 된다.

추가적인 환경변수 ignore을 알고 싶으면 해당 주소 참고
https://vixxcode.tistory.com/152
docker-compose 시 env 파일 처리 및 dockerignore 방법
1. 과정 필자는 docker-compose시 웹 애플리케이션에 env파일이 들어가는 것을 원치 않아서 어떻게 해결해야 할 지 고민이 많았다. 처음에 웹 애플리케이션에 해당하는 dockerfile 자체에서 .dockerignore 파
vixxcode.tistory.com
2. web<django> dockerfile과 디렉토리 구조

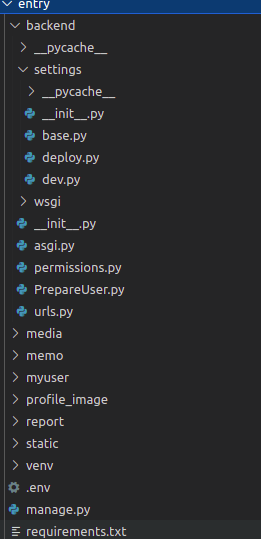
2-1. entry directory
entry 디렉토리에는 django framework 파일과 디렉토리가 저장되어 있다.

크게 보면 project 1개, app 3개가 존재한다.
settings의 경우에는 base,deploy,dev 3개로 분할하여 다뤘고,
wsgi도 그에 맞게 두개로 나눴다.
2-2.dockerfile
FROM python:3.8
ENV PYTHONUNBUFFERED 1
RUN apt-get -y update
RUN apt-get -y install vim
RUN mkdir /srv/code
ADD . /srv/code

WORKDIR /srv/code
ADD ./entry/requirements.txt /srv/code/
RUN python3 -m pip install --upgrade pip
RUN pip install -r requirements.txt
기본 이미지는 파이썬으로 하고
기본적으로 'apt-get update' 을 해주고 , 파일 편집할 수도 있으므로 'apt-get -y install vim"을 RUN해주자.
그리고 기본 작업폴더를 세팅해야 하므로 미리 'mkdir'를 통해 해당 디렉토리를 생성하고 그 디렉토리에 현재 디렉토리를 ADD해주자. 그 다음 파이썬을 하면서 필요한 라이브러리를 설치해줘야 하므로 'pip install -r requirements.txt"를 해주면 된다.
2-3.uwsgi.ini
[uwsgi]
socket = /srv/code/entry/backend/apps.sock
PYTHONHOME = 1
wsgi-file = /srv/code/entry/backend/wsgi/dev.py
chdir = /srv/code/entry
home = /srv/code/entry/venv
chmod-socket = 666
master = true
processes = 10
threads = 2
enable-threads = true
vacuum = true
socket: nginx와 통신은 소켓통신으로 한다.
wsgi-file: 컨테이너 내에서 wsgi파일의 위치를 설정한다.
chdir: 장고 프레임워크의 위치를 설정한다.
chmod-socket: 권한을 "rw-rw-rw-"로 설정한다.
그 이하는 독자가 원하는 방향으로 해주면 될 것 같다.
2-4. .dockerignore
컨테이너로 올릴 때 ".dockerignore"에 명시된 파일 혹은 디렉토리를 제외하고 올려주는 파일
entry/.env
entry/venv
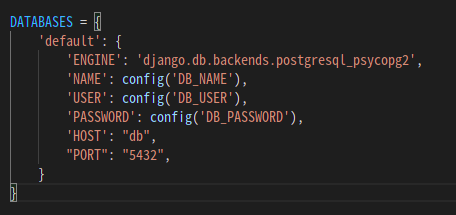
2-5.settings 안에 있는 DATABASES

CONFIG가 뭔지 궁금하면
https://vixxcode.tistory.com/133?category=993359
장고에서 환경변수 (.env) 쓰는 법
https://pypi.org/project/python-decouple/#where-the-settings-data-are-stored python-decouple Strict separation of settings from code. pypi.org 우선 위의 라이브러리를 사용하였다. 1. .env파일은 manage..
vixxcode.tistory.com
3. nginx
3-1. dockerfile
FROM nginx:latest
COPY nginx-app.conf /etc/nginx/sites-available/
COPY nginx.conf /etc/nginx/nginx.conf

RUN mkdir -p /etc/nginx/sites-enabled/\
    && ln -s /etc/nginx/sites-available/nginx-app.conf /etc/nginx/sites-enabled/
nginx-app.conf를 사용하기 위해서 심볼릭 링크를 "sites-enabled"에 만들어줘야 한다.
3-2. nginx-app.conf
server {
    listen      80;
    server_name localhost;
    charset     utf-8;

    access_log /var/log/nginx/access.log;
    error_log /var/log/nginx/error.log;

    client_max_body_size 75M;

    location /media  {
        alias /srv/code/entry/media;
    }

    location /static {
        alias /srv/code/entry/static;
    }

    location / {
        uwsgi_pass  unix:///srv/code/entry/backend/apps.sock;
        include     uwsgi_params;
    }
}
주의 깊게 봐야 할 것은 "uwgi_pass" 해당 소켓 통신할 때 쓰일 것을 명시 해줘야 한다.
3-3. nginx.conf
user root;
worker_processes auto;
pid /run/nginx.pid;

events {
    worker_connections 1024;
    # multi_accept on;
}

http {

    ##
    # Basic Settings
    ##

    sendfile on;
    tcp_nopush on;
    tcp_nodelay on;
    keepalive_timeout 65;
    types_hash_max_size 2048;
    # server_tokens off;
 # server_names_hash_bucket_size 64;
    # server_name_in_redirect off;

    include /etc/nginx/mime.types;
    default_type application/octet-stream;

    ##
    # SSL Settings
    ##

    ssl_protocols TLSv1 TLSv1.1 TLSv1.2; # Dropping SSLv3, ref: POODLE
    ssl_prefer_server_ciphers on;

    ##
    # Logging Settings
    ##

    access_log /var/log/nginx/access.log;
    error_log /var/log/nginx/error.log;

    ##
    # Gzip Settings
 ##

    gzip on;
    gzip_disable "msie6";

    # gzip_vary on;
    # gzip_proxied any;
    # gzip_comp_level 6;
    # gzip_buffers 16 8k;
    # gzip_http_version 1.1;
    # gzip_types text/plain text/css application/json application/javascript text/xml application/xml application/xml+rss text/javascript;

    ##
    # Virtual Host Configs
    ##

    # include /etc/nginx/conf.d/*.conf;
    include /etc/nginx/sites-enabled/*;
}
해당 내용은 기본 nginx에 있던 것을 그대로 가져왔다.
3-4. uwsgi_params
uwsgi_param  QUERY_STRING       $query_string;
uwsgi_param  REQUEST_METHOD     $request_method;
uwsgi_param  CONTENT_TYPE       $content_type;
uwsgi_param  CONTENT_LENGTH     $content_length;

uwsgi_param  REQUEST_URI        $request_uri;
uwsgi_param  PATH_INFO          $document_uri;
uwsgi_param  DOCUMENT_ROOT      $document_root;
uwsgi_param  SERVER_PROTOCOL    $server_protocol;
uwsgi_param  REQUEST_SCHEME     $scheme;
uwsgi_param  HTTPS              $https if_not_empty;

uwsgi_param  REMOTE_ADDR        $remote_addr;
uwsgi_param  REMOTE_PORT        $remote_port;
uwsgi_param  SERVER_PORT        $server_port;
uwsgi_param  SERVER_NAME        $server_name;
4. docker-compose build / docker-compose-up -d 그리고 이후
4-1. docker-compose build

상황에 따라 조금식 다르겠지만 successfully ~~ 이런식으로 결과가 나올 것이다.
4-2. docker-compose up -d

4-3. docker ps 를 통해 해당 컨테이너 확인

4-4. postgres 접속
4-4-1. postgres 환경 접속
docker exec -it <your_postgres_container> /bin/bash4-4-2. postgres 접속
root@7fa4ffe2ddb8:/# psql -U <your_username>4-4-3. 해당 데이터 베이스 생성
CREATE DATABASE <YOUR_DATABASE> encoding 'utf-8';4-4-4. 데이터베이스 유저 바인딩 확인
\c <your_database> <your_username>
4-5. django 접속
해당 manage.py 있는 곳으로 접근
4-5-1. python3 manage.py migrate
root@eac52867e070:/srv/code/entry# python3 manage.py migrate --settings=backend.settings.dev
Operations to perform:
  Apply all migrations: admin, auth, contenttypes, memo, myuser, report, sessions, sites
Running migrations:
  Applying contenttypes.0001_initial... OK
  Applying contenttypes.0002_remove_content_type_name... OK
  Applying auth.0001_initial... OK
  Applying auth.0002_alter_permission_name_max_length... OK
  Applying auth.0003_alter_user_email_max_length... OK
  Applying auth.0004_alter_user_username_opts... OK
  Applying auth.0005_alter_user_last_login_null... OK
  Applying auth.0006_require_contenttypes_0002... OK
  Applying auth.0007_alter_validators_add_error_messages... OK
  Applying auth.0008_alter_user_username_max_length... OK
  Applying auth.0009_alter_user_last_name_max_length... OK
  Applying auth.0010_alter_group_name_max_length... OK
  Applying auth.0011_update_proxy_permissions... OK
  Applying auth.0012_alter_user_first_name_max_length... OK
  Applying myuser.0001_initial... OK
  Applying admin.0001_initial... OK
  Applying admin.0002_logentry_remove_auto_add... OK
  Applying admin.0003_logentry_add_action_flag_choices... OK
  Applying memo.0001_initial... OK
  Applying memo.0002_memo_color... OK
  Applying report.0001_initial... OK
  Applying sessions.0001_initial... OK
  Applying sites.0001_initial... OK
  Applying sites.0002_alter_domain_unique... OK
4-5-2. uwsgi uwsgi.ini( 안 해도 됩니다.)
사실 이작업은 docker-compose 구간에서 했지만 확인 차 돌려볼겁니다.
*** WARNING: you are running uWSGI as root !!! (use the --uid flag) ***
*** uWSGI is running in multiple interpreter mode ***
spawned uWSGI master process (pid: 36)
spawned uWSGI worker 1 (pid: 38, cores: 2)
spawned uWSGI worker 2 (pid: 40, cores: 2)
spawned uWSGI worker 3 (pid: 41, cores: 2)
spawned uWSGI worker 4 (pid: 44, cores: 2)
spawned uWSGI worker 5 (pid: 46, cores: 2)
spawned uWSGI worker 6 (pid: 48, cores: 2)
spawned uWSGI worker 7 (pid: 50, cores: 2)
spawned uWSGI worker 8 (pid: 52, cores: 2)
spawned uWSGI worker 9 (pid: 53, cores: 2)
spawned uWSGI worker 10 (pid: 55, cores: 2)
4-6. 실행해보기

해당 결과는 성공! ( drf만 돌아가므로 page not found 뜨는 것은 정상입니다.)
위의 프로젝트는 보여줄 수 없지만 이와 비슷한 깃허브 주소는 올려둘께요.
https://github.com/VIXXPARK/Docker-Django-Nginx-Postgres-Template
GitHub - VIXXPARK/Docker-Django-Nginx-Postgres-Template
Contribute to VIXXPARK/Docker-Django-Nginx-Postgres-Template development by creating an account on GitHub.
github.com
'파이썬 > 장고' 카테고리의 다른 글
| [django][celery][celery-beat][flower] docker를 통한 django와 celery 연동!! (2) | 2021.08.03 |
|---|---|
| Object does not support item assignment error (0) | 2021.07.27 |
| django testcase 작성시 headers 작성 방법 (1) | 2021.07.10 |
| django testcase user create (0) | 2021.07.09 |
| DRF Testcase headers 처리 (0) | 2021.07.09 |
- Total
- Today
- Yesterday
- 그래프
- docker
- 면접
- 파이썬
- 2021 KAKAO BLIND RECRUITMENT
- Collections
- 알고리즘
- headers
- django
- env
- Python
- Spring
- docker-compose
- setattr
- PostgreSQL
- ubuntu
- 백준
- postgres
- Command Line
- Celery
- DRF
- BFS
- Java
- 프로그래머스
- thread
- 카카오
- dockerignore
- Linux
- 자바
- Pattern
| 일 | 월 | 화 | 수 | 목 | 금 | 토 |
|---|---|---|---|---|---|---|
| 1 | 2 | 3 | 4 | 5 | 6 | 7 |
| 8 | 9 | 10 | 11 | 12 | 13 | 14 |
| 15 | 16 | 17 | 18 | 19 | 20 | 21 |
| 22 | 23 | 24 | 25 | 26 | 27 | 28 |
